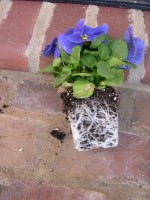
Materials:
 plant in pot or cell pack
 shovel
 trowel
 water (hose is best but bucket will do if large; you will need a lot of water)
 organic matter (compost, leaf mold, well rotted manure, peat moss)
 knife (if roots are tightly knitted together)
Steps:
1. Store all your new acquisitions out of direct sunlight in bright light or a partially shaded area and keep them well watered until you are ready to transplant them.
2. Transplant in the late afternoon or evening; if you must transplant in the morning do it early before the sun gets up and heats up the air. A cloudy day is ideal and if it is followed by several more cloudy or rainy days so much the better.
3. Water the plants until water is running out of the bottom of the pots.
4. Prepare a $50 hole for the $5 plant! Dig a hole 3 to 4 times bigger around than the pot your plant came in and at least 1 ½ times deeper. This is a good time to add organic matter to the soil you have removed when digging the hole. You can use compost, leaf mold, well-rotted manure, or peat moss. Put some of the soil-organic matter mix back in the hole to form a base on which to place the plant.
5. Fill the hole with water.
6. Loosen the soil in the pot carefully, place your hand over the top of the pot so that the plant is between two fingers, and invert the pot. Hopefully, the plant will drop into your hand. If it does not, make sure the roots are not emerging from the bottom of the pot (cut them off if they are), and try loosening the soil again. Sometimes this but may be difficult but work slowly and carefully so as not to damage the stem and leaves of the plant. Never leave the roots exposed to sun, heat or wind.
7. Check the roots of the plant. The plants in 4-6 packs or small pots are often root bound. That is the roots form a thick layer on the outside of the root ball. It is very important that you correct this condition or the roots will keep growing round and round and never mover out into the garden soil. Cut the roots on the sides and bottom of the root ball with a knife. No, this will not hurt the plant and in fact will stimulate the plant to produce more roots.
8. Place the plant into the hole and fill the hole half full of water. This process ensures that the roots are drenched with water and that no air pockets are in the soil near the roots.
9. Fill the hole with the remaining soil making a raised ring of the soil around the plant. This will create a small trench around the plant that you can fill with water everyday until the plant is established. Water again.
10. If possible, shade the plant for a few days especially if it wilts. Use a board or a piece of cardboard propped up on the sunny side of the plant.
Watch your plant daily, making sure that it is getting enough water. You will probably have to water everyday but if the weather is hot you may have to do so twice daily.
